A mini solar panel is the simplest way to add free, renewable power to a small electronics project — but only if you use it the right way.
This guide shows exactly what a 5V mini solar panel can and can't do, the safe way to charge a battery from it, and how to run an ESP32 or Arduino on sunlight.
A 5V/230mA panel is perfect for trickle-charging a single lithium cell or running a low-power microcontroller in good daylight. It is not meant for motors, lights, or anything power-hungry. The golden rule is simple: never wire a solar panel straight to a battery — always put a charge controller in between.
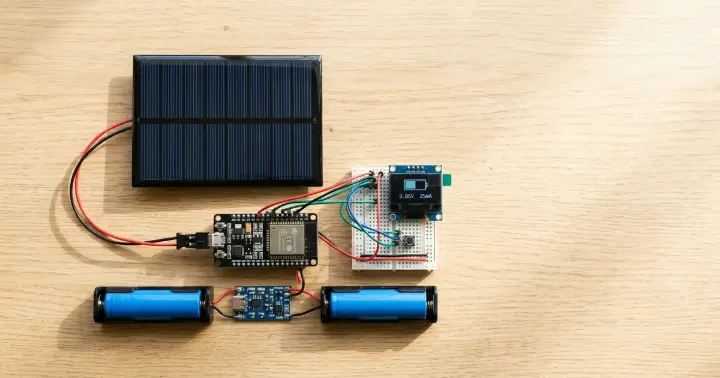
What a 5V Mini Solar Panel Actually Is
The Mini Solar Panel 5V/230mA is a compact photovoltaic panel that turns light into a small electric current.
Here are the specs that matter:
Spec | Value |
Output voltage | 5 V |
Output current | 230 mA |
Power | ~1.1–1.3 W |
Size | 100.8 × 82.5 mm |
Weight | 30 g |
Encapsulation | Epoxy resin (weather-resistant) |
Operating temperature | −20 to +60 °C |
Rated light | ~38,000 lux (bright daylight) |
Two numbers decide everything: 5 volts (roughly what a USB device or a charge controller expects) and 230 milliamps (how much current it can give in bright sun). Multiply them and you get just over one watt — enough for small, efficient electronics, and nothing more.
What It Can — and Can't — Power
Most guides skip this part. Being honest about it will save you hours.
A 5V mini solar panel is great for:
- Trickle-charging one 3.7 V lithium cell through a charge controller
- Running a low-power microcontroller like an ESP32 or Arduino in good daylight
- Low-draw sensors that sleep most of the time
- Classroom demos of light-to-electricity conversion
It is not sized for:
- DC motors, pumps, or servos
- LED strips, lamps, or anything bright
- Anything that needs more than a small microcontroller's typical current
The reason is simple: a motor might need 500 mA or more just to start, and this panel tops out around 230 mA in perfect sun. Ask it to do heavy work and the voltage simply collapses.
3 Ways to Use a Mini Solar Panel
There are three common setups, from least to most reliable.
1. Straight to a tiny load (demo only). In bright sun you can connect the panel directly to a simple load to show it works. But the moment a cloud passes or the angle changes, the output drops. Fine for a science demo, not for a real project.
2. Through a voltage regulator. Add a DC-DC step-down converter to hold a steady 5 V or 3.3 V. This is cleaner, but there is still no energy storage — when the light goes, so does your project.
3. Charge a battery, run from the battery (the right way). The panel charges a lithium cell through a controller, and your project runs from that cell. Now it keeps working at night, in shade, and through passing clouds. This is how almost every real solar project is built.
How to Safely Charge a Lithium Battery
This is the heart of any solar project, so get it right.
Never connect a solar panel — or any charger — directly to a lithium battery. Lithium cells need a controlled charge, and skipping the controller is a real fire risk.
The safe setup follows a simple chain: the solar panel feeds a charge controller, the charge controller tops up the battery, and your project runs from the battery — never from the panel directly.
For a single cell, the easiest controller is the TP4056 USB-C charging module. It takes the panel on its input pads and an 18650 lithium battery on its output pads, and safely charges the cell at up to 1 A. The onboard protection guards against overcharge and over-discharge.
A few practical notes:
- Connect the battery first, then the panel — and reverse the order when disconnecting.
- The panel's output rises and falls with the sun, so charging is slow and variable. In good light, expect a gentle top-up rather than a fast charge.
- If your project must stay powered while the battery charges, read up on "load sharing" so the cell is never drained and charged on the same pins at once.
Choosing and Sizing a Mini Solar Panel
The trick is to match the panel to how much energy your project actually uses — and the biggest win is using less.
Cut your power draw first. An ESP32 running flat out can pull 80–240 mA. The same ESP32 in deep sleep, waking once a minute to take a reading, averages a tiny fraction of that. Deep sleep is what makes a one-watt panel viable.
Then match the current. If your project's average draw is well below the panel's 230 mA, the panel can keep the battery topped up over a sunny day. If your average draw is higher, you need a bigger panel or a bigger battery.
Respect the light rating. The panel is rated around 38,000 lux — that's bright outdoor daylight. Indoors, under room lighting of a few hundred lux, the output is a trickle. Solar projects live outside, or on a bright windowsill.
For the lowest possible draw, a board like the ESP32-C3 Super Mini or an Arduino Nano sips far less than a full-size development board.
Example Project: A Solar-Powered ESP32 Sensor
Here is a classic first build that ties it all together: a self-powered temperature and humidity logger.
What you need:
- A Mini Solar Panel 5V/230mA
- A TP4056 USB-C charging module and an 18650 lithium battery
- An ESP32 development board
- A DHT22 temperature and humidity sensor
- An optional small OLED display, plus a breadboard and jumper wires
How it works:
- The panel charges the 18650 through the TP4056 all day.
- The ESP32 wakes from deep sleep every few minutes, reads the DHT22, and shows the values on the OLED or sends them over Wi-Fi.
- It then goes back to sleep, so its average draw stays tiny.
Because the ESP32 sleeps most of the time, the little panel easily replaces the energy it uses — and the battery carries it through the night. That is the whole idea behind solar-powered IoT sensors.
Frequently Asked Questions
Can a mini solar panel charge a lithium battery?
Yes — but only through a charge controller like a TP4056, never directly. The controller manages the voltage and current so the cell charges safely.
Can I connect a solar panel directly to an Arduino or ESP32?
Not reliably. The panel's voltage swings with the light, which can reset or stress the board. Run your board from a battery that the panel charges, or add a voltage regulator.
What can a 5V 230mA solar panel power?
Low-power microcontrollers and sleeping sensors in good daylight, plus a slow charge for one lithium cell. It cannot run motors, pumps, or lights.
Does a mini solar panel work indoors?
Barely. It is rated for bright daylight, around 38,000 lux. Normal indoor lighting gives only a trickle, so keep it outdoors or on a sunny windowsill.
How long does it take to charge an 18650 from this panel?
It depends entirely on the light. At a fraction of an amp in good sun, a 2000 mAh cell takes several hours and tops up gradually — treat it as a steady top-up, not a fast charge.
Do I need a charge controller if I only want to power a project in sunlight?
For a bare demo in strong sun, no. For anything that must stay reliable, yes — use a battery and a controller so passing clouds don't cut the power.
Start Your First Solar Project
A mini solar panel is one of the most satisfying upgrades you can add to an electronics project: free power, no wire to a wall, and a real lesson in how energy works. With Egypt's year-round sunshine, a small panel goes a long way.
Keep it simple to start: charge one lithium cell through a TP4056, run a low-power ESP32 or Arduino from that cell, and let the sun keep it topped up.
Ready to build? Get the Mini Solar Panel 5V/230mA together with a TP4056 charging module and an 18650 lithium battery, or browse all solar panels and cells at RAM Electronics.