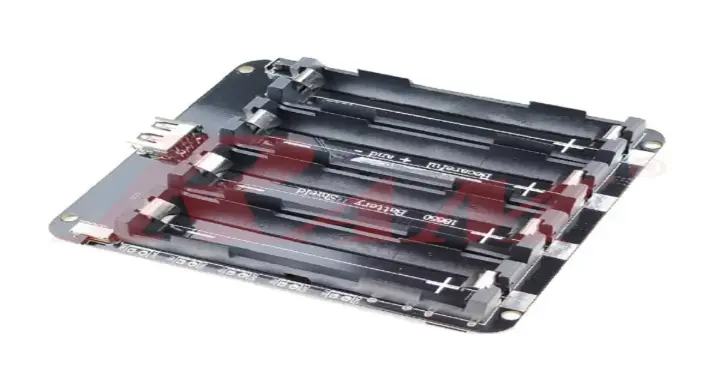
Most "DIY power bank" guides online walk you through spot-welding nickel strips and manually wiring cells to a bare circuit board — a real project that takes tools, patience, and some soldering experience. This guide is different. The Lithium Battery Shield 4x18650 is a pre-built holder shield — you insert up to four 18650 cells into their slots, connect a device, and you're done. No soldering, no welding, no wiring diagrams.
Ready to build yours? Shop the 18650 Battery Shield now
What You'll Need
- The shield itself — holds up to four 18650 cells with built-in charging and protection circuitry
- Four 18650 lithium cells (not included) — RAM stocks a 3.7V 18650 rechargeable cell that fits directly
- A Micro USB cable to charge the shield itself
- An enclosure (optional) — the shield works fine exposed, but a case protects it for daily carry
How to Build It — Step by Step
- Check your cells first. Use a multimeter to confirm all four 18650 cells read a similar voltage, with no dents, leaks, or swelling. Mixing a healthy cell with a damaged or very different one is the most common cause of problems in any 18650-based build.
- Insert the batteries correctly. The board is clearly marked positive and negative at each slot — match them exactly. Installing a cell backwards can burn out the module, so double-check before pushing each cell fully into place.
- Charge the pack. Connect a Micro USB cable to the shield's charging input (600mA–800mA) to top up the cells.
- Connect your device. Plug your phone or USB device into the 5V/3A output. For lower-voltage projects (Arduino, ESP32, ESP8266), use the 3V/1A output instead.
- That's it. No soldering, no case-cutting required — the shield is ready to use as soon as the batteries are seated correctly.
How Much Capacity Will You Get?
Total capacity depends entirely on the cells you use, not the shield itself — the shield holds the cells in parallel, so their capacities add up while the voltage stays at a single cell's 3.7V nominal. RAM's own 3.7V 18650 cell is rated at 2000mAh actual capacity. Four of them gives you:
- 4 × 2000mAh = 8000mAh combined capacity
- At the shield's rated 95% conversion efficiency, that's roughly 7,600mAh of usable output through the USB port
Use fewer or higher-capacity cells and the math scales accordingly — this is the main advantage of a modular shield over a sealed, fixed-capacity power bank.
DIY Power Bank vs. Buying One Ready-Made
A sealed, pre-built power bank is simpler to buy, but it comes with trade-offs a shield-based build doesn't have:
- Replaceable cells. When one cell degrades in a sealed power bank, the whole unit is usually discarded. With this shield, you swap out just the one weak cell.
- Capacity you choose. You're not locked into whatever capacity the manufacturer picked — use two cells for a lighter pack or four for maximum runtime.
- Reuse what you already have. Healthy 18650 cells salvaged from old laptop batteries or power tools (after checking their voltage and condition) can go straight into the shield.
- Transparency. You know exactly which cells are inside and can check their health at any time, instead of trusting a sealed unit's unknown internals.
The trade-off is upfront assembly — you're building it yourself rather than buying a finished product off the shelf.
Need a smaller build instead? RAM also stocks a 2x18650 version of this shield for a lighter, more compact pack with two cells instead of four.
Full Specifications
Specification | Value |
Output Voltage | 5V/3A and 3V/1A |
Input Port | Micro USB |
Conversion Efficiency | 95% |
Battery Capacity Supported | Up to 4× 18650 cells |
Battery Voltage Range | 3.2V – 4.2V |
Dimensions | 100 × 90 × 20 mm |
Weight | 71 g |
Choosing the Right Cells
- Pick cells with similar capacity and age — mismatched cells drain and charge unevenly, which shortens their lifespan.
- Protected cells (with built-in overcurrent/overdischarge protection) add an extra safety layer on top of the shield's own protection circuit.
- A 2000mAh cell like the one RAM stocks is a reasonable, safe starting point if you're building your first pack.
Safety Tips for Your Build
- Polarity first, every time. Double-check + and - at each slot before inserting a cell — this is the single most common way to damage the module.
- Keep cells away from heat sources. Direct sunlight, car interiors, and enclosed spaces near heat-generating electronics all shorten lithium cell lifespan and increase risk.
- Store spare cells safely. If you're not using all four slots, store spare 18650 cells in a case rather than loose in a bag or drawer, away from metal objects that could short the terminals.
- Don't mix cell chemistries or capacities long-term. Even if the shield accepts them, consistently mismatched cells age unevenly and can affect the whole pack's performance.
Frequently Asked Questions
Do I need to solder anything to use this shield?
No. Insert the 18650 cells into their marked slots with correct polarity, and the shield is ready to use — no soldering or wiring required.
What happens if I insert a battery backwards?
The module can burn out. Always match the positive and negative markings on the board before inserting a cell.
Can I mix old and new batteries in the same shield?
It's not recommended. Use cells of similar age, capacity, and voltage to avoid uneven charging and reduced battery life.
Does the shield come with batteries?
No, batteries are sold separately — the shield holds up to four 18650 cells that you provide.
Can I power an Arduino or ESP32 project with this instead of charging a phone?
Yes — the 3V/1A output is suited for low-voltage projects like Arduino, ESP32, and ESP8266 boards, in addition to the 5V/3A USB output for phones and standard devices.
Is a 4-cell DIY power bank actually cheaper than buying one ready-made?
It depends on the cells you choose, but the bigger advantage is usually flexibility, not just price — you control the capacity, and you can replace a single weak cell instead of discarding the whole pack.
Ready to build your own power bank? Get the 18650 Battery Shield today or browse the full Batteries & Chargers collection