A breadboard jumper wire kit is one of the first things you buy when you start building circuits — and one of the most confusing, because there are two very different kinds and they look nothing alike.
This guide explains the 140-piece solid-core kit, compares it head-to-head with the flexible Dupont jumpers most beginners already own, and shows exactly when to reach for each.
Solid-core pre-formed wires give you a flat, tidy, easy-to-read breadboard, while flexible jumpers are faster to throw together and better for connections that move — and most serious builders keep both.
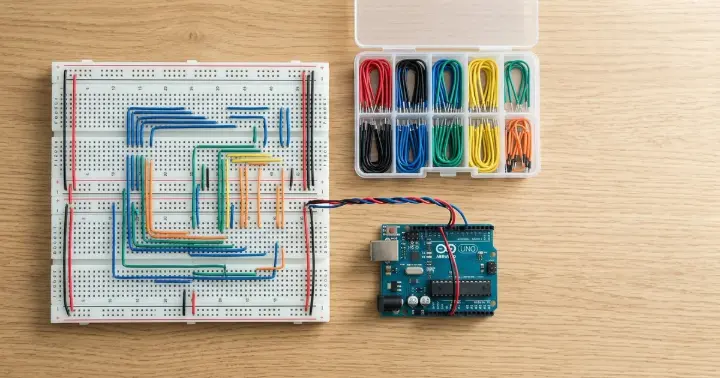
What Is a Breadboard Jumper Wire Kit?
A breadboard jumper wire kit is a boxed set of short, pre-cut wires made to plug straight into a solderless breadboard.
This kit contains 140 solid-core wires, sorted into 14 lengths — from a tiny 2 mm hop between neighboring rows up to a 125 mm reach across the board. You get 10 wires of each length.
Here is what matters:
Spec | Detail |
Quantity | 140 wires |
Lengths | 14 sizes (2–125 mm) |
Gauge | 22 AWG (0.64 mm) |
Core | Solid (single conductor) |
Ends | Pre-cut, pre-stripped, pre-formed |
Reusable | Yes, stored in a case |
Because the ends are already bent at a right angle, each wire lies flat against the board instead of arching over it. This flat style is why these kits are often sold as U-shape jumper wires.
Solid-Core vs Flexible (Dupont) Jumper Wires
This is the comparison that trips up almost everyone. The two types solve the same problem in opposite ways.
Solid-core kit wires are single, stiff strands with bare bent ends. They sit flush on the board and keep their shape.
Flexible jumper wires — the male-to-male Dupont jumpers that come in ribbons — have a stranded core and plastic header pins on each end. They bend freely and reach anywhere.
Solid-core kit | Flexible Dupont | |
Appearance | Flat and tidy | Loops and tangles |
Core | Solid, single strand | Stranded |
Ends | Bare, bent | Plastic header pins |
Best at | Clean, stable layouts | Quick, movable links |
Reading the circuit | Easy to trace | Harder in a bundle |
Length fit | Exact (14 sizes) | Fixed, often too long |
Neither is "better" — they are built for different jobs.
When to Use Each
Pick based on what the project needs, not habit.
Reach for the solid-core kit when:
- You want a clean layout you can read and debug at a glance
- The circuit will sit on the board for a while
- You are photographing or demonstrating the build
- You are teaching, and tidy wiring helps students follow along
Reach for flexible jumpers when:
- You are wiring quickly and will tear it down soon
- You need to connect to a sensor or module that sits off the board
- A connection has to flex or move
- You need a male or female header pin, not a bare end
A common workflow is to rough a circuit out with flexible jumpers, then rebuild the final version with the solid-core kit so it is neat and reliable.
Why 22 AWG and 14 Lengths Matter
Two details make a solid-core kit work, and both are easy to get wrong.
The gauge is 22 AWG, or 0.64 mm. That is the sweet spot for a breadboard: thick enough to seat firmly in the metal clips, thin enough to slot in cleanly. Keep in mind that a higher AWG number means a thinner wire, so 24 AWG is thinner than 22, not thicker — and thin wire can wobble loose in the clips and cause intermittent faults.
The 14 lengths let you match the wire to the gap. Instead of a long jumper looping across the board, you drop in the exact size for each connection. Short hops stay short, long runs stay flat, and nothing dangles. That is what keeps the board readable.
How to Keep Your Breadboard Tidy
A solid-core kit gives you a tidy board, but a few habits make it much better.
- Color-code by purpose. Pick one color for positive power, one for ground, and others for signals. You will read the board far faster.
- Use the shortest wire that reaches. Slack is what turns a board into spaghetti.
- Route flat, not over components. Keep wires low so you can still reach and swap parts.
- Keep power rails on the edges. Run red and black down the side rails first, then branch inward.
These habits pay off most on bigger builds with an Arduino UNO or Arduino Nano, where a dozen connections can quickly become hard to follow.
Common Breadboard Wiring Mistakes
Most "my circuit doesn't work" moments on a breadboard come down to the wires, not the code.
- Thin wire that won't seat. Wire thinner than 22 AWG can slip in the clips and drop the connection without you noticing. Stick to 22 AWG.
- A splayed solid end. A solid wire whose bare end has been bent wide open stops gripping the clip. Pinch it straight again or swap in a fresh one.
- Jumpers routed over the chip. Wires crossing an IC make it impossible to swap the part or probe a pin. Route around components, not across them.
- One color for everything. If power, ground, and signals are all the same color, a single misplaced wire is almost invisible. Color-code from the start.
Frequently Asked Questions
What is a breadboard jumper wire kit used for?
It supplies ready-made wires to connect points on a solderless breadboard — linking a microcontroller, sensors, and components without soldering. The solid-core kind also keeps the layout flat and tidy.
Are solid-core or flexible jumper wires better for a breadboard?
Neither is better overall. Solid-core pre-formed wires give a cleaner, more stable board that is easy to trace. Flexible Dupont jumpers are faster to connect and better for parts that sit off the board or move.
What gauge wire is best for a breadboard?
22 AWG (0.64 mm) is the standard. It seats firmly in the breadboard clips. Thinner wire, such as 24 or 26 AWG, can sit loosely and cause intermittent connections.
Can I use these jumper wires with an Arduino?
Yes. They fit any standard solderless breadboard used alongside boards like the Arduino UNO, Arduino Nano, or an ESP32. They connect the board to the rest of your circuit.
Why are the wires different lengths?
So you can match each wire to the exact gap it bridges. Using the right length keeps wires flat and the board readable, instead of long jumpers looping everywhere.
Are the wires reusable?
Yes. Solid-core kit wires are pre-stripped and pre-formed, so you can pull them out and reuse them across many projects. They store back in their case by length.
The Bottom Line
A breadboard jumper wire kit is a small upgrade that changes how your projects look and how easily you can debug them. The 140-piece solid-core set gives you the right length for every connection and a board you can actually read, while flexible jumpers stay handy for quick and movable links.
The simplest approach is to keep both: prototype fast with flexible jumpers, then build the clean, final version with the solid-core kit.
Ready to tidy up your builds? Get the 140-piece breadboard jumper wire kit and a solderless breadboard to go with it, or browse all jumper wires and cables and breadboards at RAM Electronics.