


W3230 DC12V Digital Temperature Controller – Microcomputer Thermostat Switch with 1m Sensor Cable
Specifications:
- Model: W3230
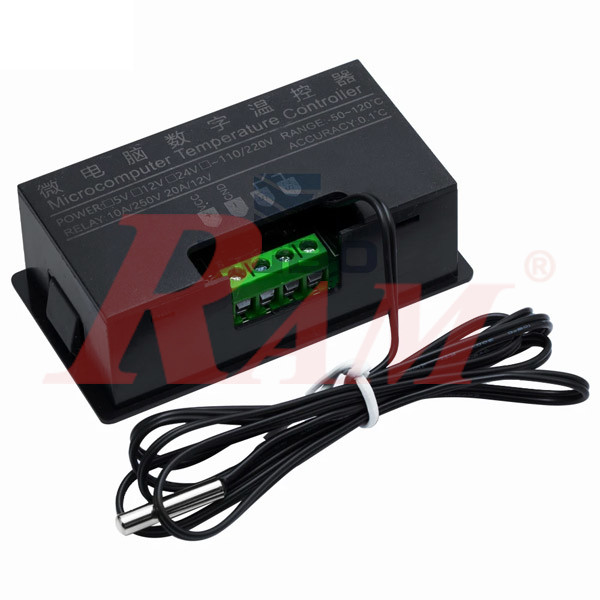
- Power Supply: DC 12V
- Temperature Control Range: -50°C to 120°C
- Resolution: 0.1°C (-9.9 to 99.9°C), 1°C for other ranges
- Measurement Accuracy: ±0.1°C
- Control Accuracy: ±0.1°C
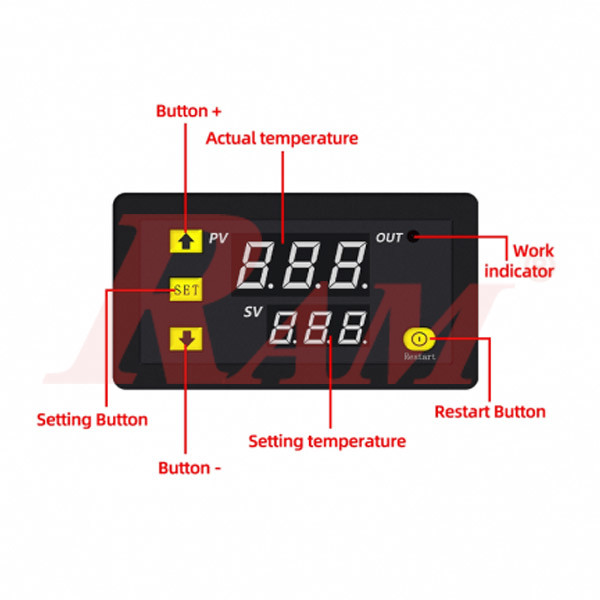
- Display: Dual LED display – Red for actual temperature, Blue for set temperature
- Sensor Type: NTC 10K waterproof probe, 1m cable length
- Relay Output Capacity: 20A @ 12V DC / 10A @ 220V AC
- Operating Temperature: -10°C to 60°C
- Operating Humidity: 20% to 85% RH
- Dimensions: 79 × 43 × 26 mm
- Panel Cutout Size: 73 × 39 mm
- Weight: Approx. 44g
Functions & Features:
- Selectable Heating or Cooling mode
- Adjustable temperature hysteresis (0.1°C to 15°C)
- Upper and lower temperature limits setting
- Temperature calibration function (-7°C to +7°C)
- Delay start function (0–10 minutes)
- Data storage to retain settings after power loss
- Factory reset option
Programming:
1. Function Overview
- P0 – Select Mode: Refrigeration (C) or Heating (H)
- P1 – Return Difference (Hysteresis) Setting
- P2 – Maximum Temperature Limit
- P3 – Minimum Temperature Limit
- P4 – Temperature Calibration (Correction)
- P5 – Delay Start Time (minutes)
- P7 – Memory Function (Save Settings after Power Loss)
2. Quick Start
-
Set Target Temperature
- Press SET once → temperature display flashes.
- Press + / – to adjust target temperature (hold for fast change).
- Press SET to confirm.
- The controller will automatically switch the relay ON/OFF according to the set temperature.
-
Power & Output
- Relay Output: 10A – suitable for high-power loads.
- Display shows the current ambient temperature during normal operation.
3. Display & Indicators
-
Indicator Light
- Flashing = Delay start is active.
- Solid ON = Relay is energized (output ON).
-
Display Messages
- LL = Sensor not connected.
- HH = Temperature out of range – relay forced OFF.
- – – – = High temperature alarm.
4. Parameter Settings
To adjust parameters P0–P5:
- Long press SET for 5 seconds → P0 appears.
- Press + / – to scroll through parameters.
- Press SET to enter the parameter → adjust with + / –.
- Press SET to confirm.
- Long press SET or wait 10 seconds with no action to save and exit.
P0 – Refrigeration / Heating Mode
-
C = Cooling Mode
- Relay ON when temperature ≥ Set Point.
- Relay OFF when temperature ≤ Set Point – P1.
-
H = Heating Mode
- Relay ON when temperature ≤ Set Point.
- Relay OFF when temperature ≥ Set Point + P1.
P1 – Return Difference (Hysteresis)
- Range: 0.1 – 15.0°C
- Prevents frequent switching by setting a gap between ON/OFF temperatures.
Example – Cooling:
- Set Point: 25°C, P1: 2°C
- Relay ON at 25°C, OFF at 23°C → repeats cycle.
Example – Heating:
- Set Point: 25°C, P1: 2°C
- Relay ON at 25°C, OFF at 27°C → repeats cycle.
P2 – Maximum Temperature Limit
- Limits the highest allowed Set Point.
- Range: up to 110°C.
Example:
If P2 = 60°C, you cannot set the target temperature above 60°C.
P3 – Minimum Temperature Limit
- Limits the lowest allowed Set Point.
- Range: down to -50°C.
Example:
If P3 = 2°C, you cannot set the target temperature below 2°C.
P4 – Temperature Calibration
- Correct sensor deviations.
- Range: -7.0°C to +7.0°C.
Example:
Display shows 25.0°C:
- Set P4 = +1.5 → display shows 26.5°C.
- Set P4 = -1.5 → display shows 23.5°C.
P5 – Delay Start (Minutes)
- Range: 0–10 minutes.
- Protects compressor/heater life by delaying restart.
Example – Cooling:
If delay = 5 minutes, after stopping the cooling device, it won’t restart until at least 5 minutes have passed.
P7 – Memory Function
- Set P7 = ON → Retains last settings after power loss.
5. Restore Factory Settings
If settings are incorrect or unstable:
- Power OFF.
- Press + and – together.
- Power ON while holding both buttons.
- All settings reset to factory defaults.
Your Dynamic Snippet will be displayed here...
This message is displayed because youy did not provide both a filter and a template to use.