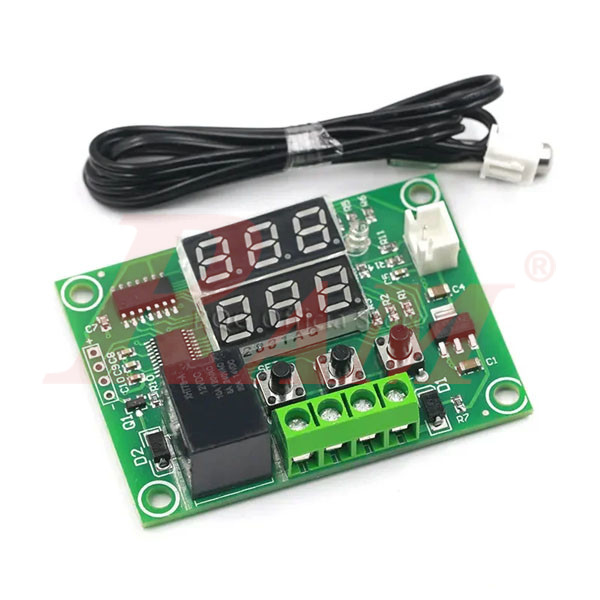
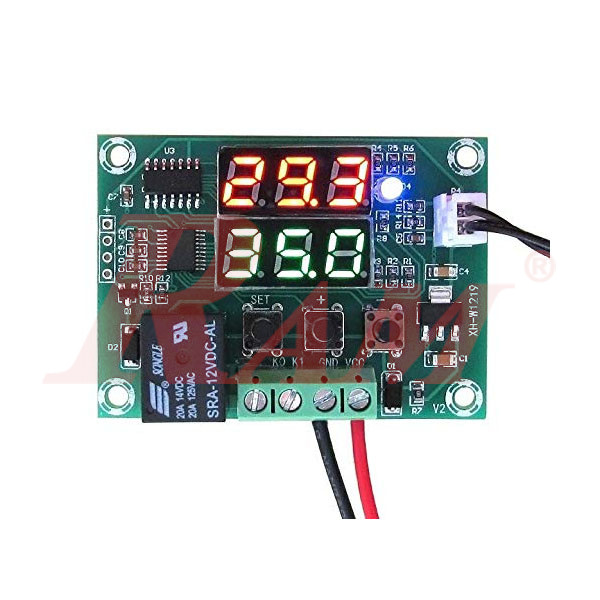
W1219 Dual Display Programmable Temperature Control Switch Relay
Thermostat Switch
مرجع داخلي:
KIT.W1219.TEMP.CONTROL
XH-W1219 Dual Display Digital High-Precision Temperature Controller
Specifications:
- Temperature Control Range: –50 °C to +110 °C
- Resolution: 0.1 °C
- Measurement Accuracy: ±0.5 °C (calibratable)
- Display: Dual LED (Red = Current Temperature, Green = Set Temperature)
- Power Supply: DC 12 V
- Sensor Type: Waterproof NTC 10K thermistor, cable length ~0.5 m
- Relay Output: Max 10 A (120 VAC) or 10 A (14 V DC)
- Operating Current: ~40 mA (relay off), ~90 mA (relay on)
- Dimensions: Approx. 60 × 44 × 16 mm
- Weight: 22–28 g
Programmable Parameters (P0–P6):
- P0: Heating (H) / Cooling (C) mode selection
- P1: Hysteresis (Return difference) 0.1–30 °C
- P2: Maximum temperature limit (up to +110 °C)
- P3: Minimum temperature limit (down to –30 °C)
- P4: Temperature calibration offset (–10 °C to +10 °C)
- P5: Delay start time 0–10 minutes
- P6: High-temperature alarm setting (0–110 °C, displays “HHH” when exceeded)
Applications:
Suitable for aquariums, incubators, greenhouses, refrigeration units, HVAC systems, and other temperature control projects.
Quick Setpoint Adjustment
-
Press the SET button once.
- The green display (setpoint) will flash.
- Use the + / – buttons to adjust in 0.1 °C increments.
-
Press SET again to save, or simply wait 5–8 seconds — the display will auto-save and revert to normal
Entering Parameter Setting Mode (P0–P6)
-
Long-press the SET button for about 3 seconds (on some units, you may need two attempts).
- The red display will show P0, while the green display shows its current value (default “C”).
- Navigate between parameters using the + / – buttons.
- When you see the desired parameter (P0–P6), press SET to edit it — the value will flash.
-
Adjust using + / –, then stop pressing — the module will auto-save after ~5–8 seconds and return to the temperature display
Parameter Guide (P0–P6)
Parameter | Code | Function | Default Value |
|---|---|---|---|
| P0 | Heat/Cool Mode | Choose “C” (cooling — relay energizes at setpoint) or “H” (heating — relay de-energizes at setpoint). | C (Cooling) |
| P1 | Hysteresis | Temperature difference before relay toggles again, helps avoid frequent switching. Range: 0.1–30 °C. | Typically 2.0 °C |
| P2 | Max Setpoint Limit | Upper boundary for set temperature. Range up to 110 °C. | 110 °C |
| P3 | Min Setpoint Limit | Lower boundary for set temperature. Range down to –30 °C. | –30 °C |
| P4 | Temperature Calibration | Offset adjustment (–10 °C to +10 °C) to correct sensor errors. | 0.0 °C |
| P5 | Delay Start | Delay before relay action after temperature is reached. Range: 0–10 minutes. | 0 minutes |
| P6 | High-Temp Alarm | Defines alarm threshold. Above this, display shows “HHH” and relay de-energizes. Range: 0–110 °C. | OFF / 0 °C |
Factory Reset
- Press and hold both the + and – buttons simultaneously for approximately 3 seconds to restore all settings to defaults.
Your Dynamic Snippet will be displayed here...
This message is displayed because youy did not provide both a filter and a template to use.


